Disclaimer: Please see your doctor if you have any pain in your shoulder. This article is meant to be informative and not a form of treatment.
Snap and POP! What happened to my bicep? A young man explains he was only reaching for his whey protein on the top shelf!!! Could the snapping of his bicep tendon be prevented? The answer truly lies between his bicep brachii or his coracobrachialis; one of them just gave up! Perhaps if he incorporated stretches for his pectorals and incorporated weekly rotator cuff exercises, this may have been avoided. In truth, many people find rotator cuff exercises boring, but with a little diligence, injury is truly preventable.
There’s a good chance you’ve heard the term “rotator cuff”. And it’s usually preceded by someone explaining the pain they’re enduring, the lack of range of motion, and in the worst case, that they’ve had to give up their favorite sport or activity.
We will all have some sort of rotator cuff pain in our life time. The key is to heed the warning signs and apply some preventive measures to avoid it becoming chronic. One example is having pain when you are putting on a shirt overhead. An extreme example is when brushing your teeth, it becomes too painful to continue the movement due to the position of the arm. This is called shoulder impingement. A few more examples are the inability to bench press a barbell with a noticeable difference in strength usually followed by pain. AAAAH but is not pain a cleanser!!!! NO!
Other characteristic causes are carrying a heavy purse or handbag on one side for prolong period of time, or engaging repetitive movements that force you to lean forward like typing. Another cause is constantly exercising with poor form or not giving the rotator cuff enough recuperation time (e.g. barbell training with a supine grip for 8 sets)! Overhead athletic sports such as baseball and even boxing without learning proper form can lead to this issue. My favorite culprit is seeing an unsuspecting newbie learning an Olympic lift exercise that requires scapular stability/mobility but powering through it. Adrenaline can mask a lot pain and discomfort one may be going through as they exercise. However, when the adrenaline subsides, the pain rises.
This article is for the weekend warrior, lay person and even the cross fitter. It will entail a short description of the rotator cuff function including some tests to highlight which muscles may be involved. I have also attached photos of basic movements that may alleviate pain. However, it’s important to assess what is causing the problem to prevent a reoccurrence.
In the best interest of educating the reader, I need to provide some key terms. One key term that can describe a condition from a lifestyle or especially poor posture, is called kyphosis. Kyphosis can literally mean an exaggerated “hump” in the upper mid back of the spine. It may not be as evident as Mr. Burns’s from “The Simpsons” but you can tell if one is developing — rounded shoulders are one indicator. The great news is, this can be reversed or managed.
It’s also worth noting, a long forgotten past blunt trauma or fall that injured / bruised the shoulder may also be the current cause of your ailment. Lastly, and most surprisingly, your hip health can also be a contributor to poor shoulder mechanics.
How can the hip be a contributor? If you think of the core muscles as a corset, the corset runs from the hips to the shoulder girdle. If there is one hip that is “hiking” or uneven from the ASIS (hip pointer) to the other side ASIS (hip pointer) when taped measured, then your shoulder girdle / scapulae must compensate on the opposite side. This means your opposite shoulder will turn in more.
The rotator cuff’s function is to allow you to lift your arm in all anatomical planes of motion; depending where you lift your arm in space will dictate the primary rotator cuff muscles responsible. The scapula also plays a major role in stabilization along the middle part of the spine called the thoracic spine. All muscles work together in one way or another to provide mobility, stability and strength.
The following tests will help to identify the source of the pain, and to provide some basic corrective exercises. I advise you to seek professional help if the pain persists.
Before you take any of these tests, if you cannot lift your arm up without pain then seek medical attention. These tests are primarily to see if your muscles are inflamed, however only a health professional can confirm the extent of your injury. Use these test as a tool to help you make an informed decision.
Extend your arm out in front with palm facing in: Any inability to fight resistance may indicate the following:
1) Have someone “gently push down” on your wrist — hold isometrically. If there is pain, supraspinatus & infraspinatus may be compromised
2) Have someone “gently push to the side” on your wrist — hold isometrically. If there is pain, teres minor & infraspinatus may be compromised
3) Have someone “gently push on the inside” on your wrist — hold isometrically. If there is pain, subscapularis may be compromised
At this point, I would suggest stopping all resistance activities that cause pain and try the following bodyweight movements. I will also show you four basic rotator cuff exercises and a bonus reactive drill. Lastly, I will provide you with some scapulae drills which will include exercises for your wrist. Remember they are ALL interconnected. At this point the goal is to get you out of pain and then you can address any further muscle imbalances with a thorough movement screen.
Rotator Cuff: Reps 12-15 Sets- 2-3 (Your elbow must stay in a 90 degree angle.)
• Internal rotation: Lie on your side and keep your arm 90 degrees on your ribs. Lift arm up only with the elbow. You can use 1-3 lbs or even a can of soup! Your elbow must stay in a 90 degree angle.
• External rotation: Lie on your side but lower the can from the high angle slowly (3 counts). Your elbow must stay in a 90 degree angle

• Post Cuff: Find a door stall that will bring your elbow to shoulder height. With a can rotate to horizontal position then reverse movement till the can lines up with your ear. Your elbow must stay in a 90 degree angle.

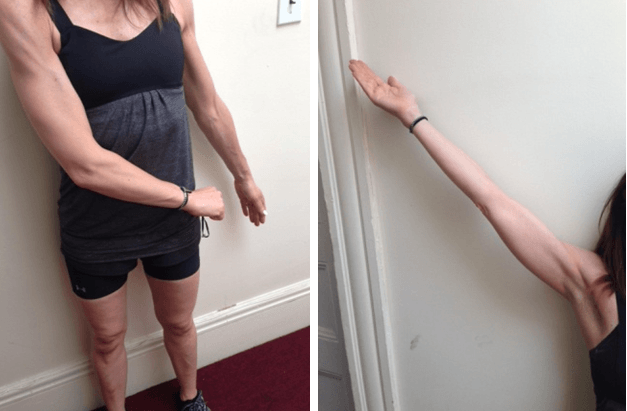
• Drawn sword: Place your right hand in front of your left pocket and slowly without bending the elbow lift the arm up diagonally as if you are emptying a can over your shoulder leading with the thumb. Reverse movement.

Now if you want to make this fun . . . Try these exercises standing on the round side or flat side of a BOSU (use discretion) using a cable machine with 3-5lb resistance (same exact movements) It will work your core stability and address your rotator cuff health.
Scapular Exercises: Lateral & Unilateral.

Have arms extended out in front of you with palms facing up. Slowly, extend through your finger tips and open up the chest by bringing the arms back as if the thumbs are going to touch the wall behind you. Exhale as you do the movement and focus on pinching the shoulder blades and not shrugging.
Second movement, arms extended out in front of you with palms together. Slowly, extend your right arm diagonally upward and the left arm diagonally downward. Palms should be opposites. (The right palm facing up and the left palm facing down). Extend through your finger tips and imagine your right thumb is going to touch the wall behind you and your left pinky the wall below. Exhale as you do the movement and focus on not shrugging.

Scapular retraction:
Have your back against the wall, (heels, tailbone, back of head touching the wall) and have elbows pressed against ribs with palms facing up. Without removing elbows from ribs try to bring your thumbs to touch the wall. Keep arms at same height of waist. Reverse movement.

Clearing the neuro pathways. Three wrist movements for neck tightness.
Keep this stance for all 3 wrist movements. A. Stand tall and laterally extend your arm to side at shoulder height. Look straight and set your palm position as if you are holding up a wall. Hold for 10 seconds. B. Next, flex the wrist down palm facing you. Hold for 10 seconds. C. Lastly, have your palm facing the wall upside down, finger tips facing the floor- keep flexed for 10 seconds.

Bonus!
1. Ball bounce: A small ball is preferred, less than 6 oz. Face a wall and with elbow bent and lined up with shoulder and begin to paddle the ball against the wall. Repeat for 25x. Work up to 100x. You should not increase the ball weight to more than 3 lbs.

These drills are for preventive purposes. You can easily add them to your routine at least once per week. However, if you are encountering discomfort now, then you may also find these very useful. I would suggest incorporating them 3x per week and if your condition persist, please see a health profession.
The rotator cuff conundrum is now solved, and preventing pain is no longer a mystery unless you decide to revert to old habits. Training is not linear — you will encounter peaks and valleys, and utilizing these simple drills you may find your peers at awe at how you just keep on going — without pain!
Was this Article Helpful?
If this article was helpful to you, please consider linking this article to your own blog or sharing this through the social buttons below. You will also find other great articles at “Workouts“.
- 4shares
- 4Facebook
- 0Twitter
- 0Pinterest
- 0LinkedIn
Julio Salado
Latest posts by Julio Salado
- The Rotator Cuff Conundrum - August 22, 2014
- Regress to Progress: Accessory Exercise for Olympic Cleans - May 18, 2014


